The foundation of any plan within RightCapital starts with the initial data entry process. Getting comfortable inputting a client's income, savings, assets & liabilities, expenses, and goals is a pivotal step in using RightCapital to its fullest potential. In this article, we'll guide you through the process of creating a new household, and entering all of a client's information.
We find that the best way to learn RightCapital is to use it! If possible, we recommend following along with this article using your own RightCapital account for some valuable hands-on experience.
Creating a Household

Invite Client to Input Information
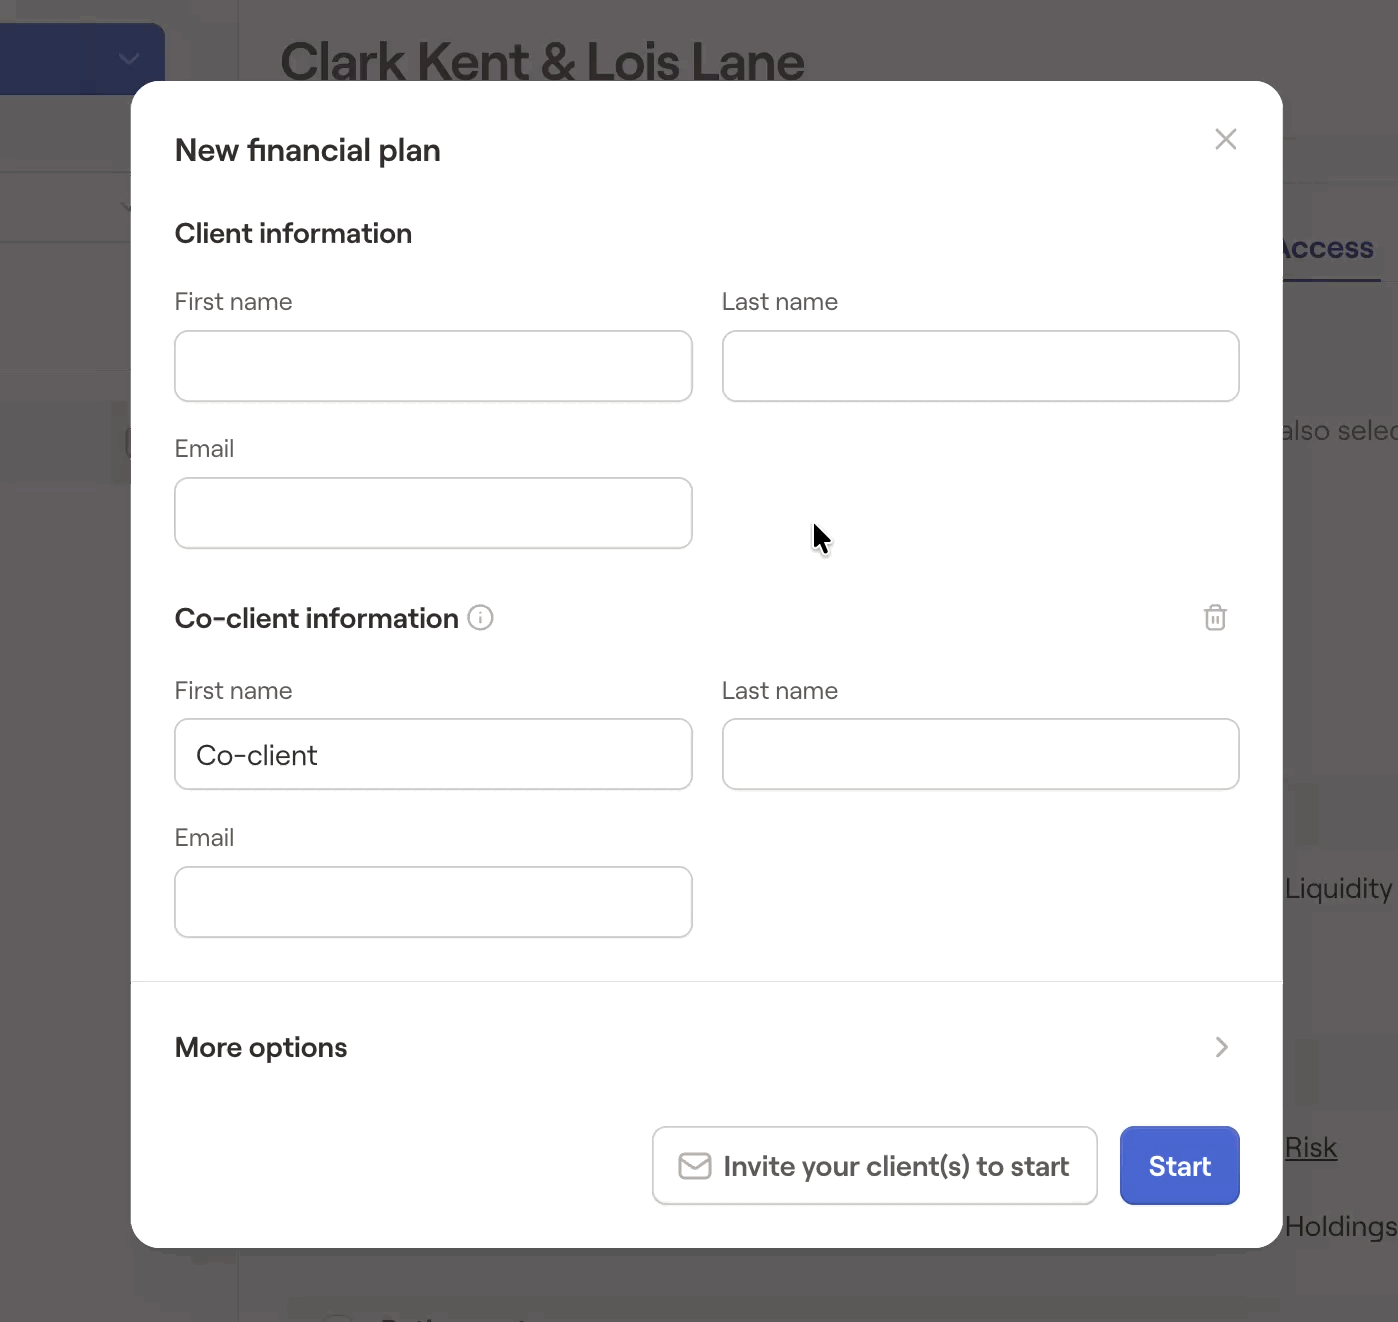
While inviting clients in RightCapital is always optional, many successful advisors find that it helps bolster client engagement and strengthen relationships in the long term. For more information, feel free to take a look over the Client Experience section of our Help Center.
Initial Data Entry Process
With the client plan created, the next step is to complete the initial data entry by entering the client's information. RightCapital's intuitive step-by-step data entry process will walk you through the process of entering each client's income, expenses, savings, financial goals, and more:
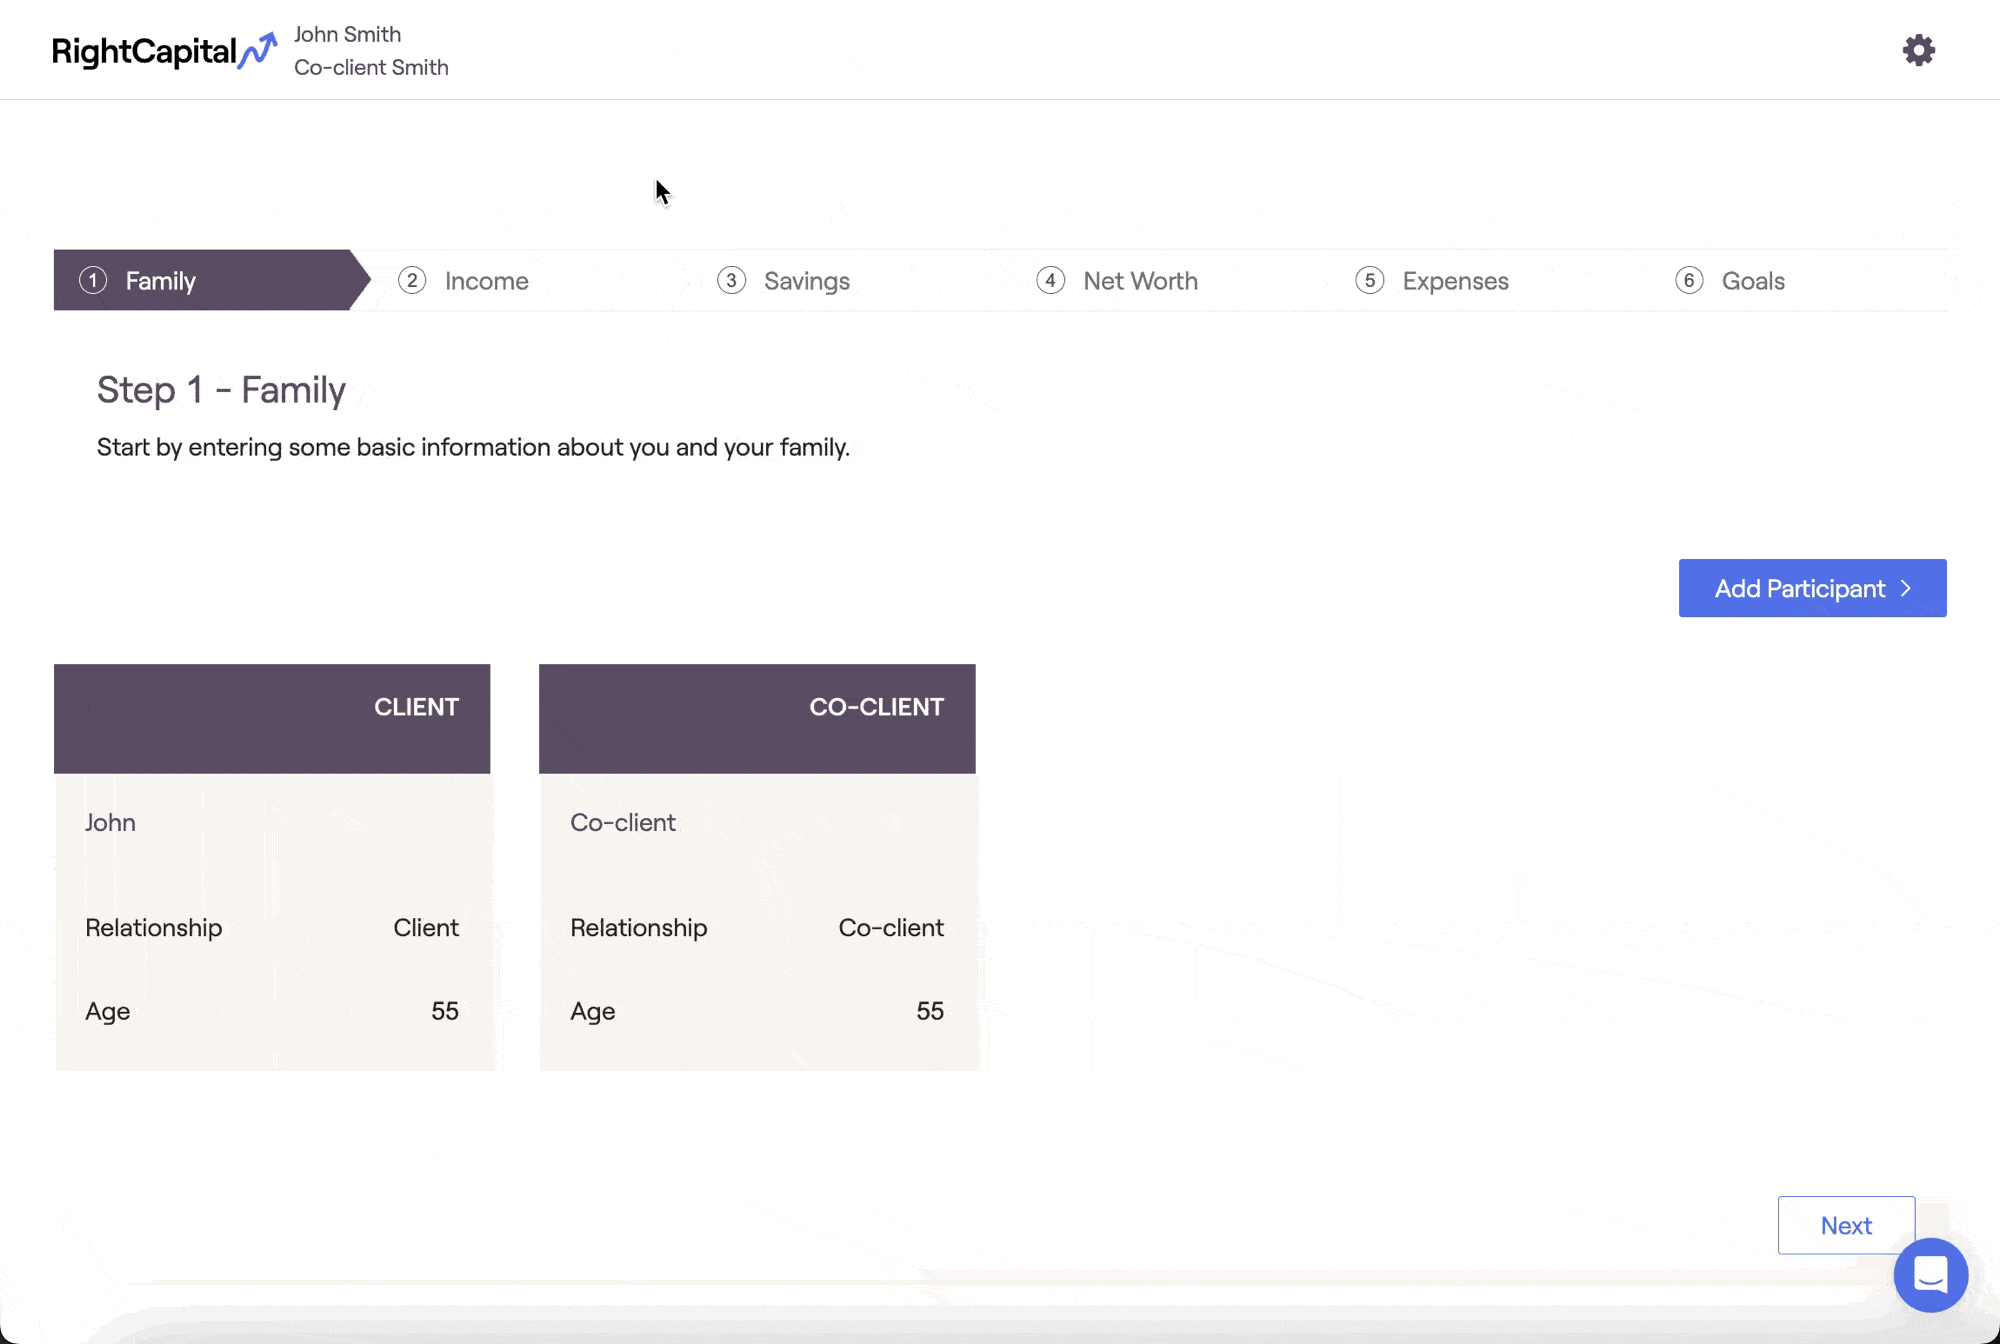
Family
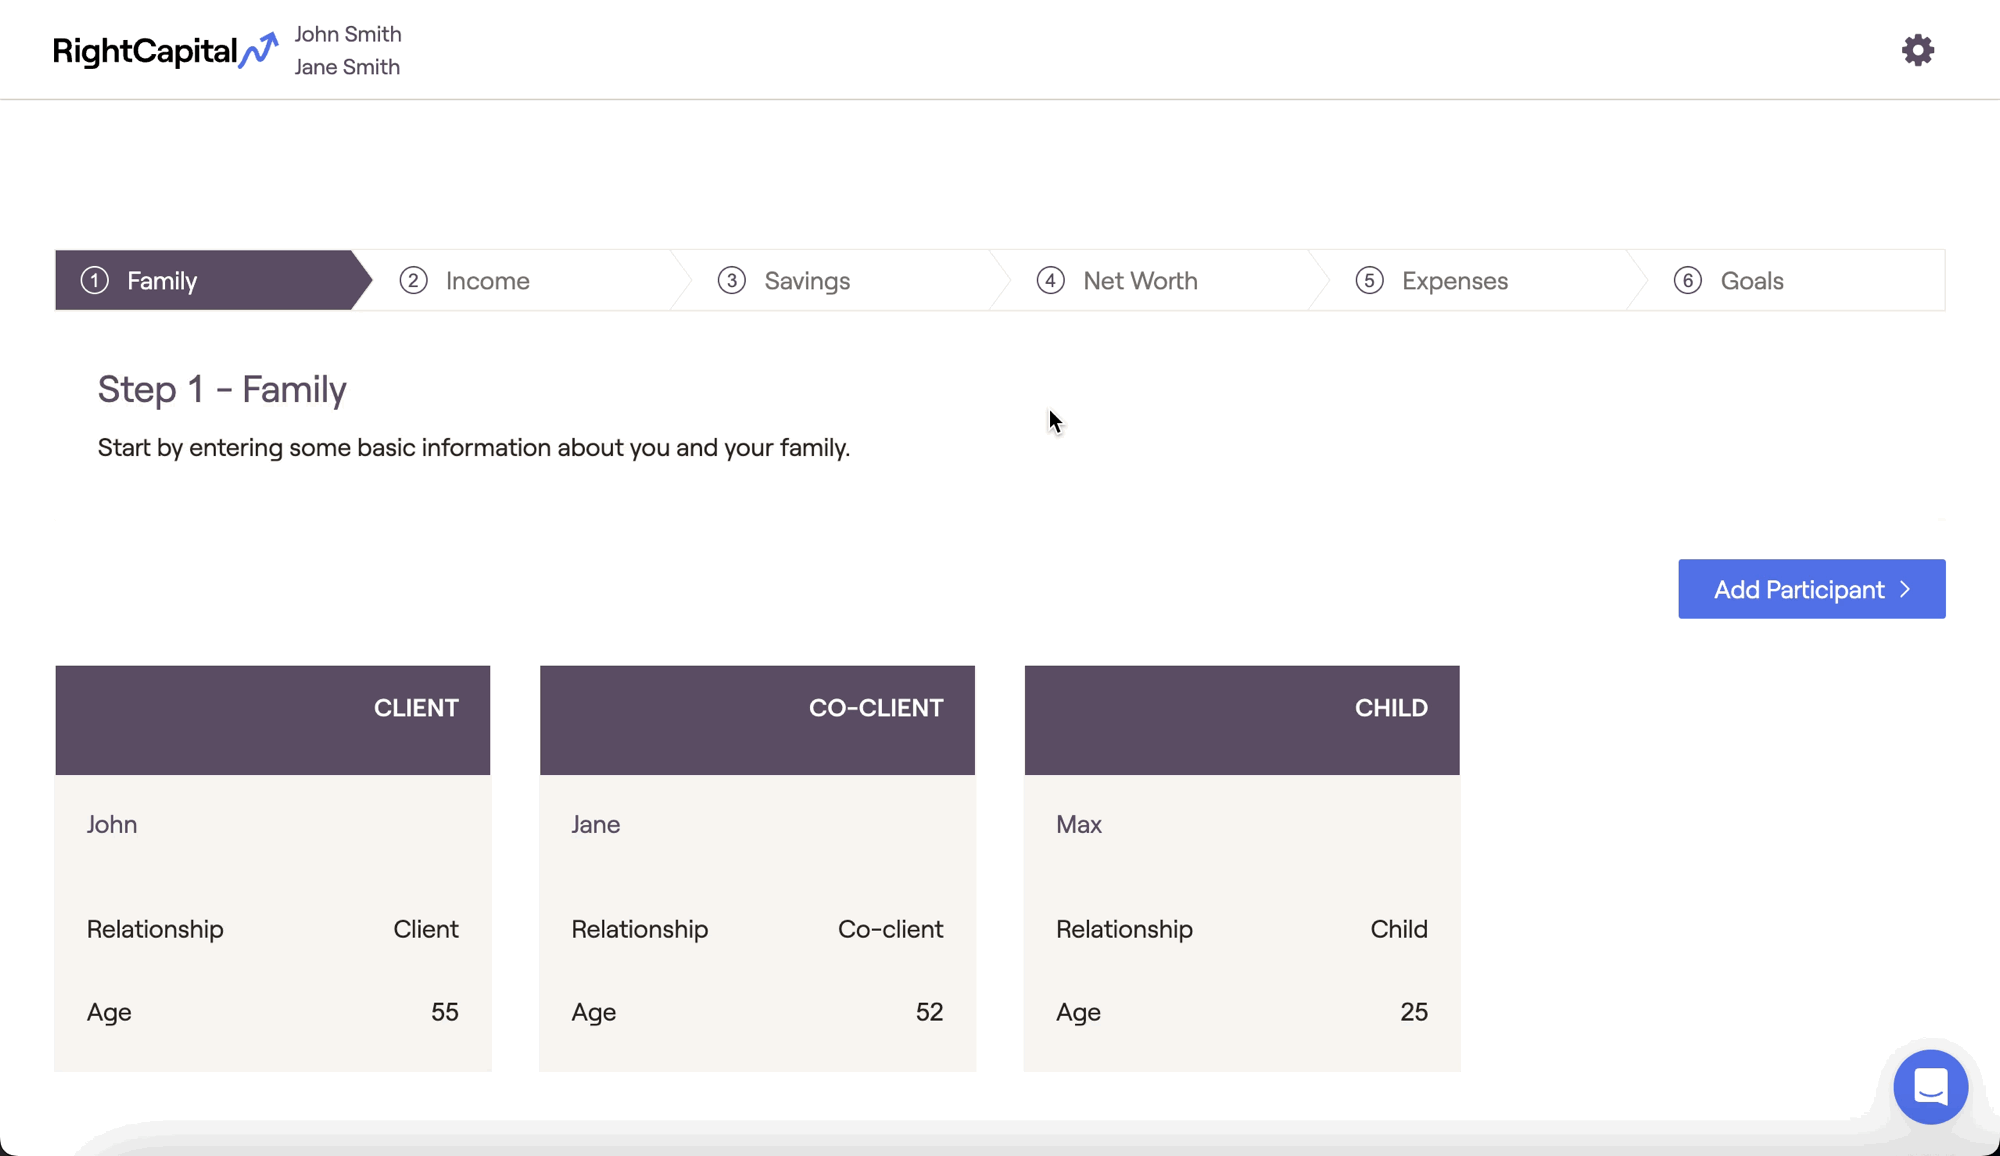
Click into the Client and Co-Client cards to update names, birthdays, and planning horizons (the assumed date of death for each client). For plans without a co-client, this card can be removed.
Enter the resident state (where the clients live) within the Client card. This input is used for state tax calculations.
Add additional family members, like children and grandchildren, via the Add Participant button in the upper right.
For more detailed information on the Family step of the initial data entry, please feel free to reference the following article:
You can also watch our training video on the Family Profile below:
Income
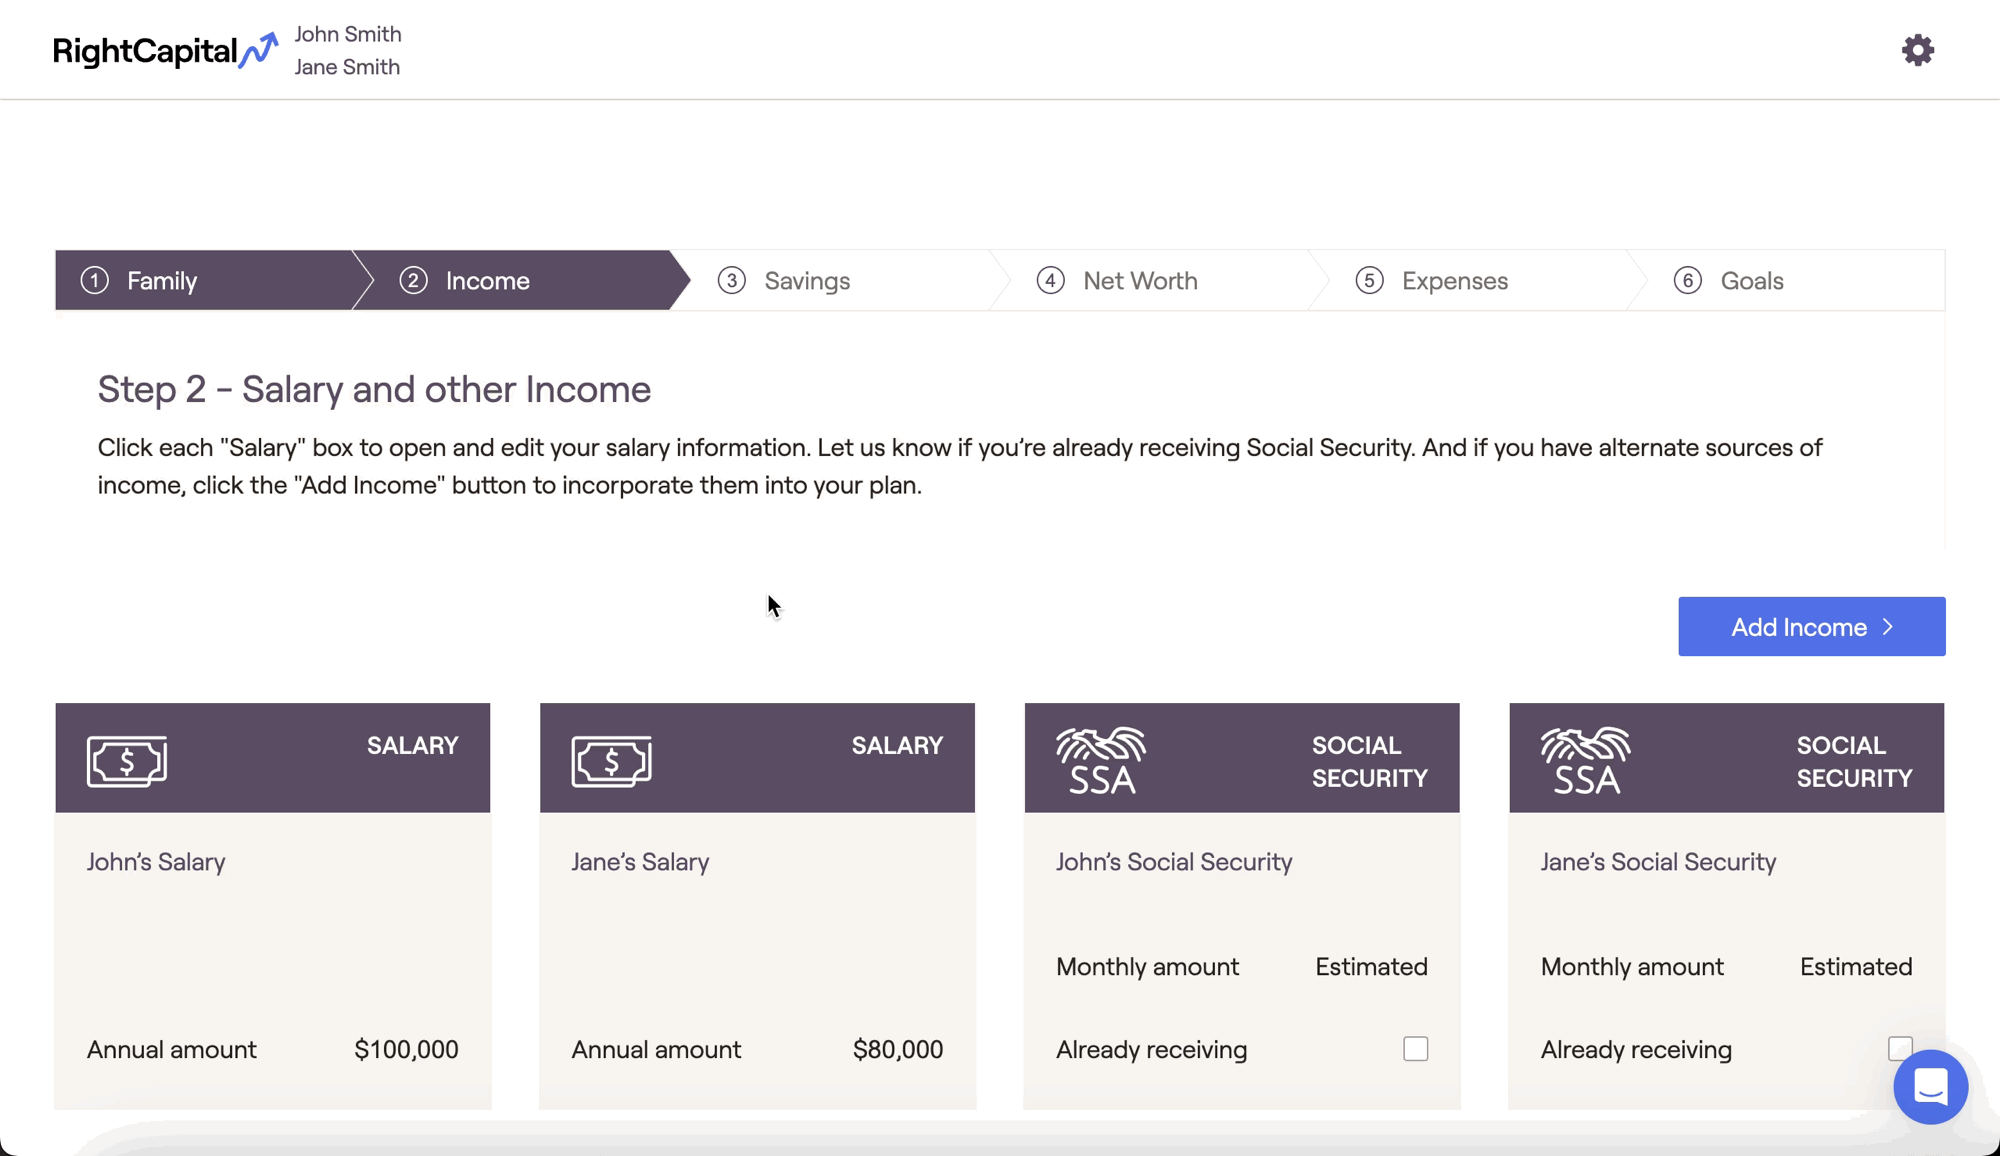
For clients with W2 income, click into the pre-populated Salary cards to enter the annual amount and duration of each salary. For clients without W2 income, these cards can be removed.
Click on the Social Security cards to enter each client's current or future retirement benefits. For more on entering Social Security, click here.
Add additional income streams (self-employment, pension, bonus, etc.) by clicking the Add Income button in the upper right.
For more detailed information on the Income step of the initial data entry, please feel free to reference the following article:
You can also watch our training video on the Income section below:
Savings
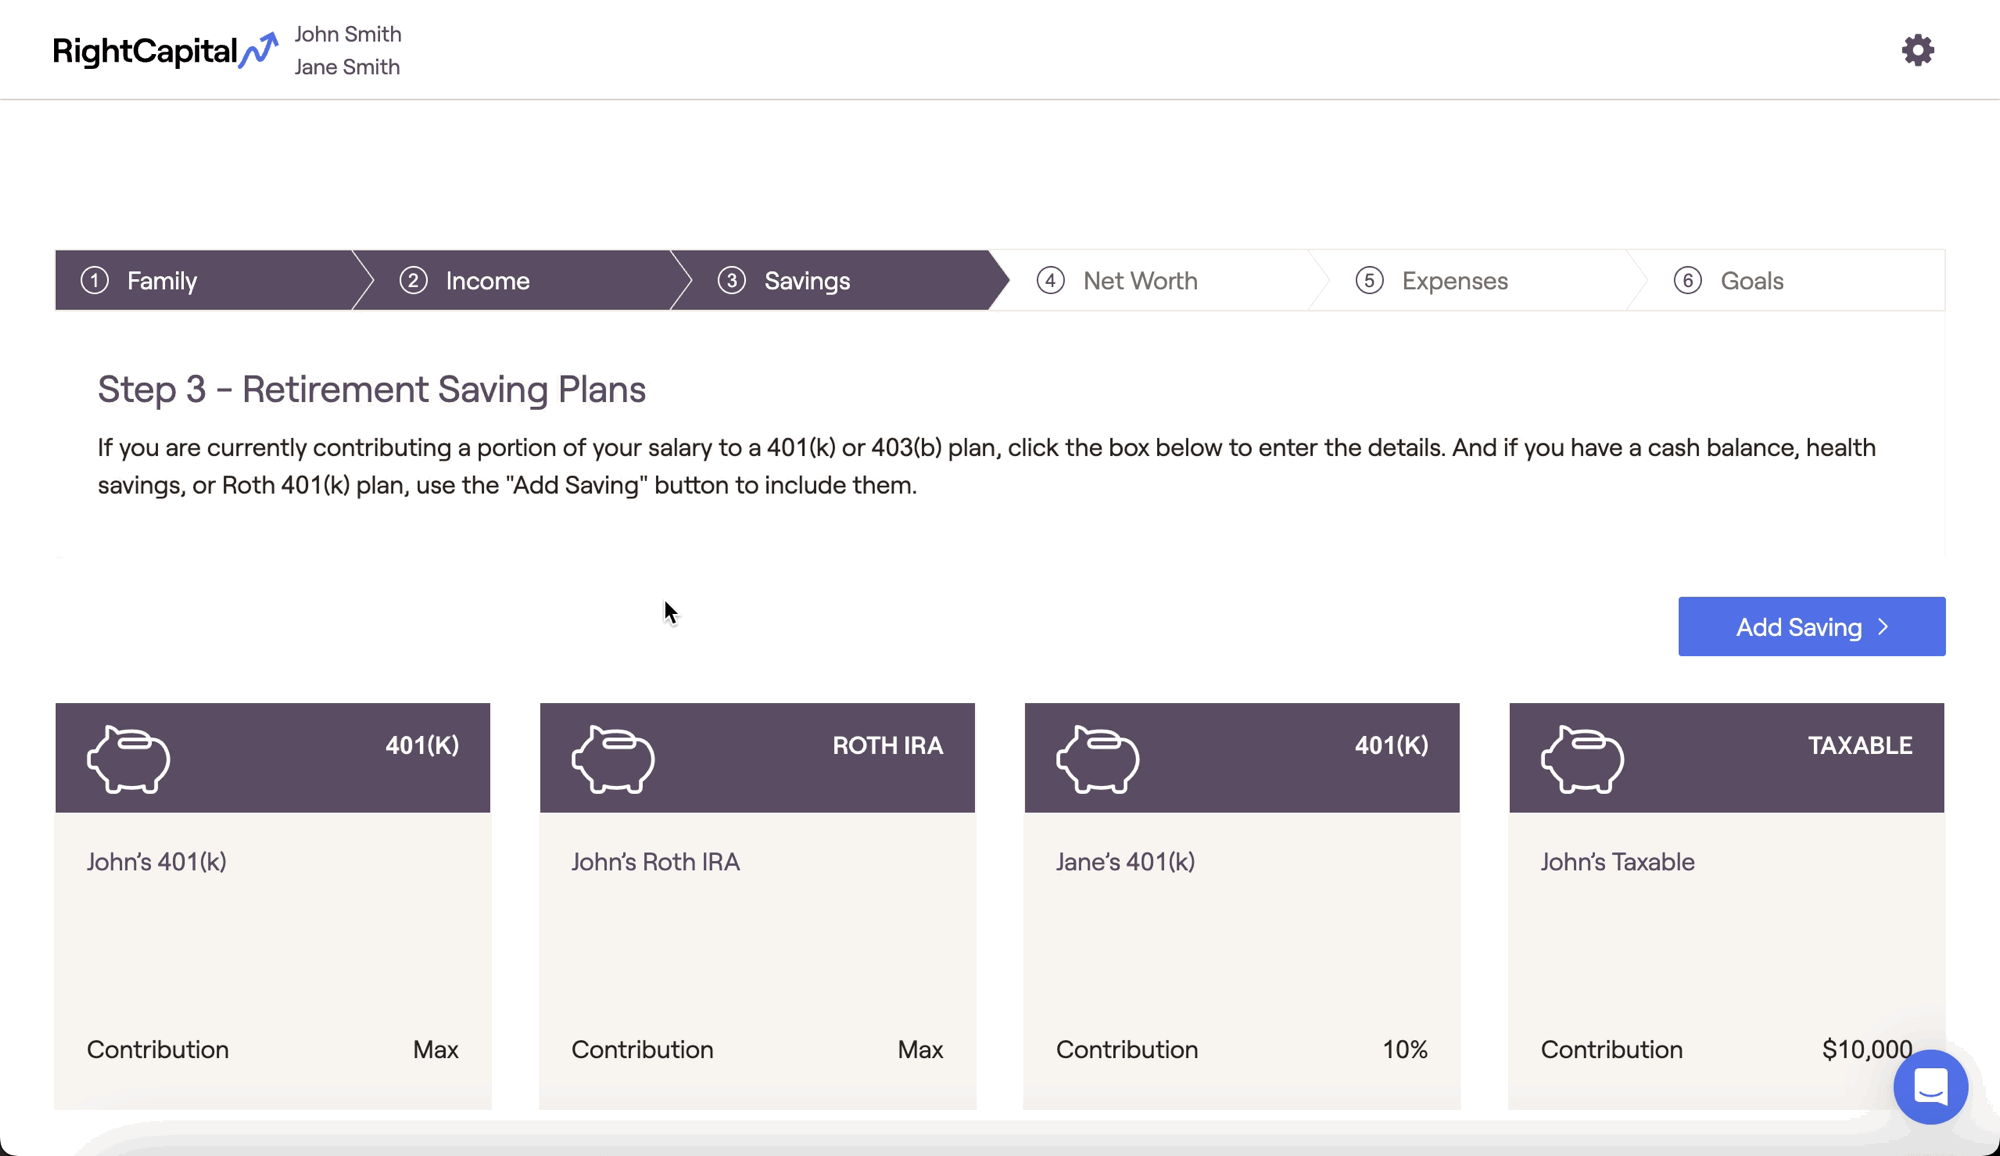
- For clients with 401(k) accounts, you can use the pre-populated 401(k) savings cards to reflect employee and employer contributions. For clients without 401(k) accounts, these cards can be removed.
You may also see a Taxable savings card pre-populated in the Savings area. Use this card to reflect after-tax contributions into a taxable investment / brokerage account.
Add additional savings (Traditional or Roth IRA, HSA, 529, etc.) by clicking the blue 'Add Saving' button in the upper right.
For more detailed information on the Savings step of the initial data entry, please feel free to reference the following article:
You can also watch our training video on the Savings section below:
Net Worth

If you are a premium or platinum subscriber, your clients can link their accounts directly to RightCapital via Account Aggregation. This will automatically pull in current balances and position-level account data.
If you have one or more advisor-level Integrations set up, you can link a client's accounts directly to their RightCapital financial plan. This will automatically pull in current balances and position-level account data.
Accounts can always be added manually to a client's Net Worth by clicking the Add Account button, and selecting an account type.
For more detailed information on the Net Worth step of the initial data entry, please feel free to utilize the resources below:
You can also watch our training video on the Net Worth section below:
Expenses

For clients that have yet to retire, the pre-retirement living expenses card can be utilized to capture the household's monthly expenses within the projections. This card be be skipped or deleted for retired clients.
Specify the household's tax filing status within the Tax and Fees card. You can also enter any local taxes, as well as average AUM fees.
Add additional expenses (medical, alimony, extra debt payment, etc.) by clicking the blue 'Add Expense' button in the upper right.
For more detailed information on the Expenses step of the initial data entry, please feel free to utilize the resources below:
You can also watch our training video on the Expenses section below:
Goals
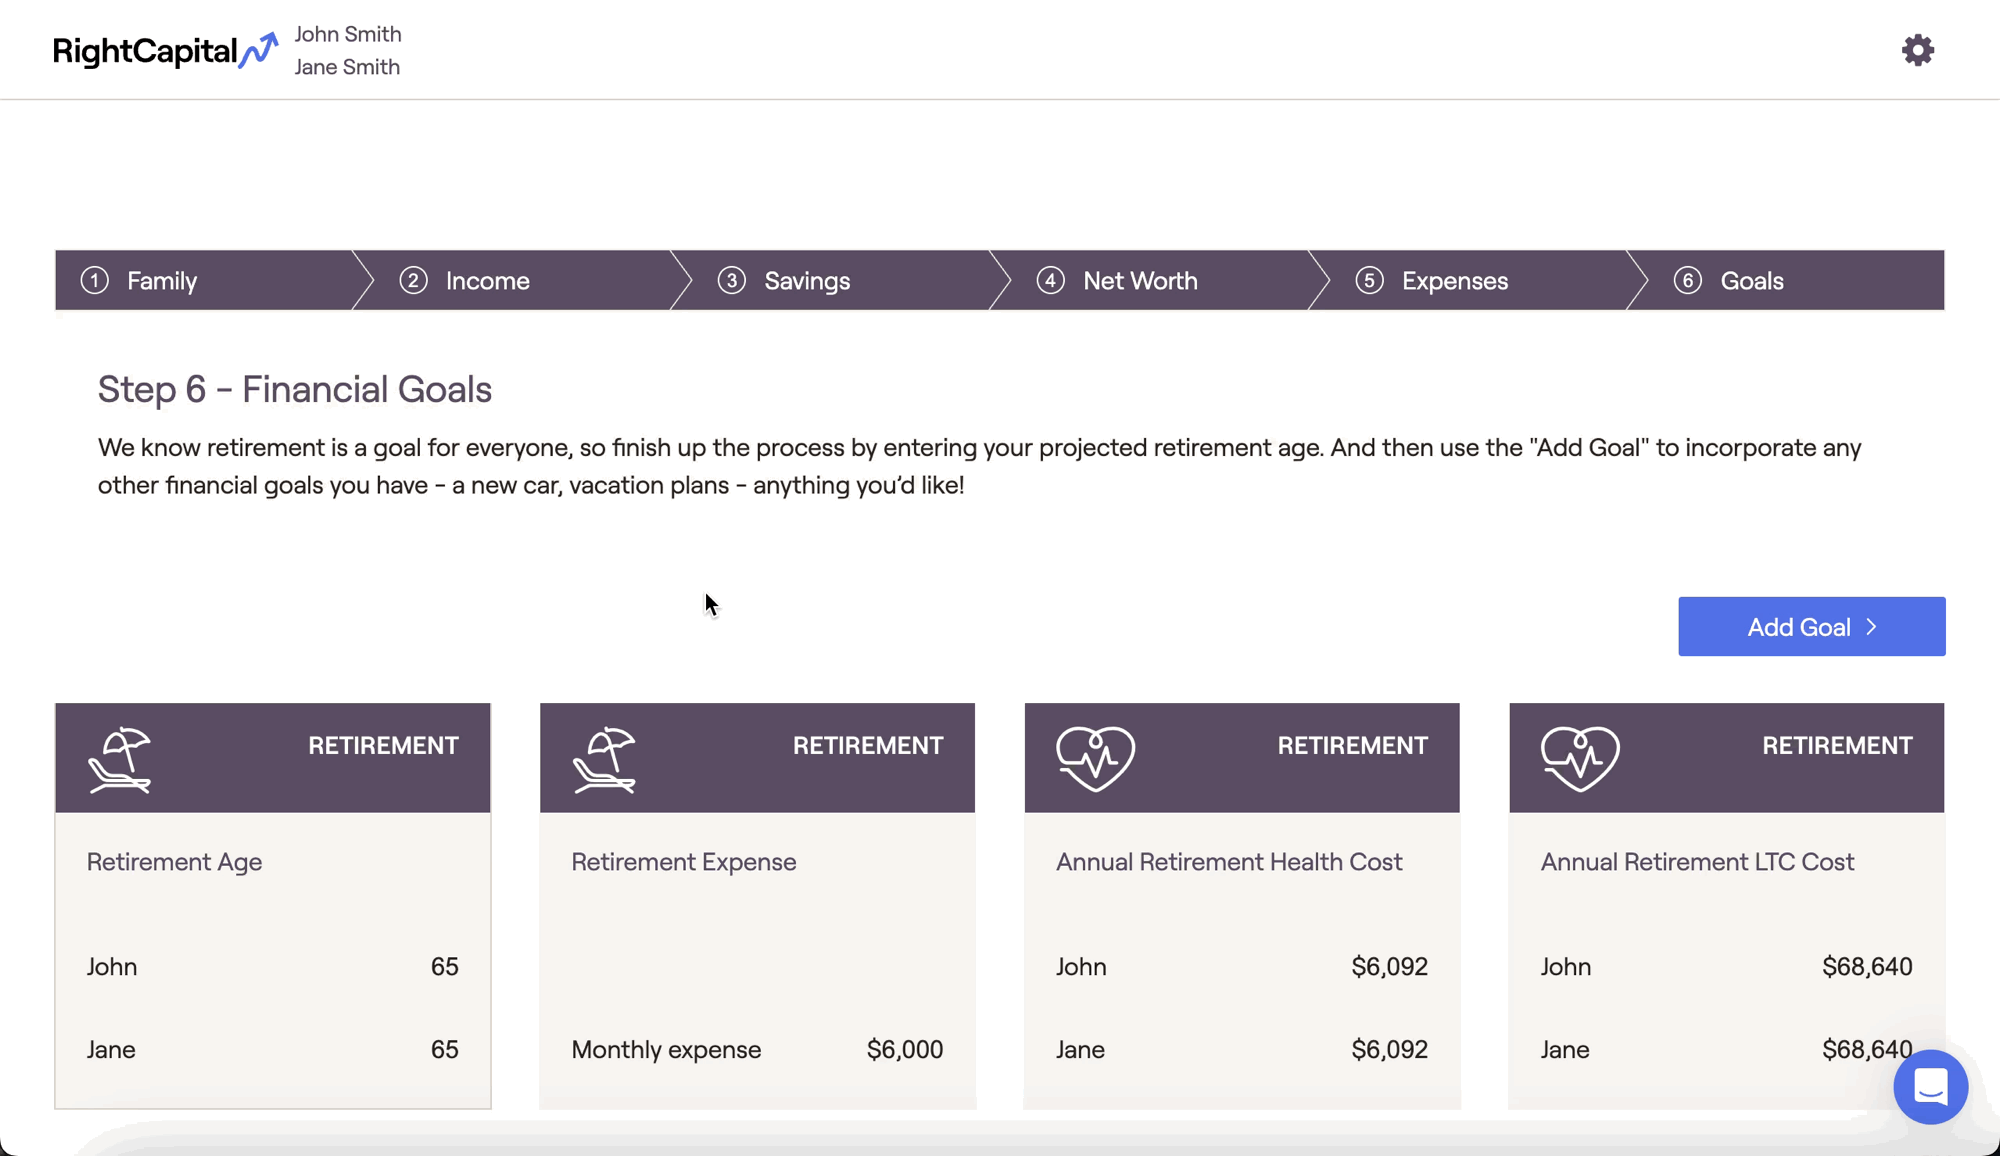
Use the Retirement Age card to specify the target age of retirement for each client. For retired clients, enter the age that they retired.
The Retirement Expense card can be utilized to capture the household's monthly retirement expenses within the projections.
The Retirement Health Care Cost goal card allows you to reflect a client's healthcare costs in retirement. Similarly, the LTC Cost card allows you to input expected LTC costs.
Add additional goals (education, vacation, asset purchase, etc.) by clicking the blue 'Add Goal' button in the upper right.
For more detailed information on the Goals step of the initial data entry, please feel free to utilize the resources below:
You can also watch our training video on the Goals section below:
Data Import
An alternative method to traditional data entry is by utilizing Data Import. This feature enables you to upload reports, plan notes, meeting transcripts and more to automatically upload data to a new or existing financial plan. This process expedites the data entry process and can enable you to focus on creating value for your clients.
The three data import options available are:
Select each link to learn more about each option.
Completing the Data Entry
Great work! You've completed the second step in our Getting Started Roadmap. To move on to the next step and start reviewing the planning modules in RightCapital, click the link below!
If you need to navigate back to our Getting Started Roadmap, click here.


