Income - where the household's primary income sources are entered. This includes client salaries and social security benefits, as well as other income streams such as self-employment income, pension income, and more.
Savings - where you will enter prospective annual contributions to a client's various investments. This includes contributions to 401(k) and IRAs, taxable brokerage accounts, Roth accounts, 529s, and much more.
Expenses - where a number of important variables are specified within the plan. This area is where you'll input pre-retirement living expenses, medical expenses, and extra debt payments.
There will be a number of income cards pre-populated within this section when you create a new client plan. There will be a Salary card present for each client, as well as a Social Security card:
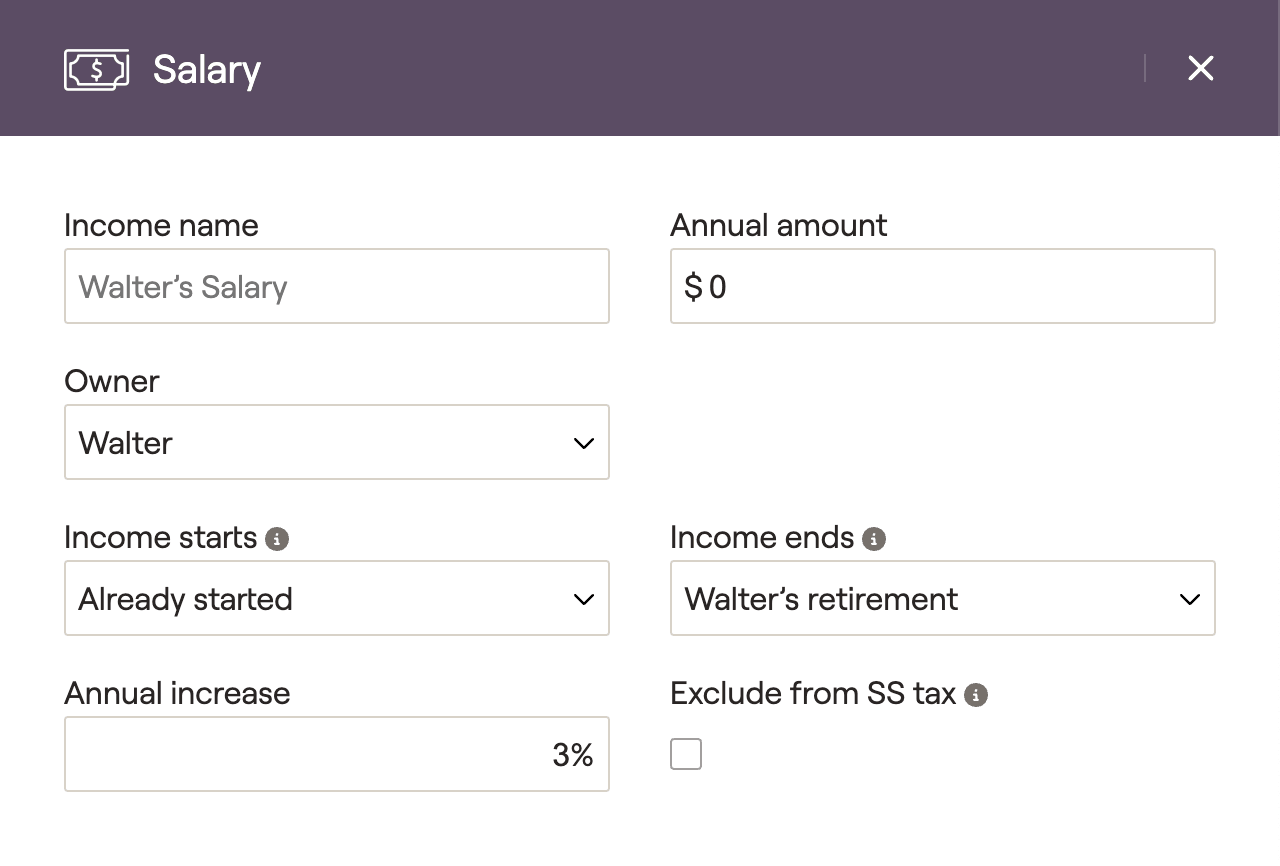
For clients with W2 income, you can utilize the pre-populated Salary cards for one or both clients. Click on this card to open a data entry drawer on the right side of your screen, allowing you to input the salary information:
1
The Income name will default to [Client's] Salary, but you can enter a custom name if you'd like. In joint plans, you will also want to choose either the client or the co-client as the Owner.
2
Enter the Annual amount of the client's salary. This should be the client's current gross salary, as taxes will be applied automatically within the plan projections.
3
Specify the duration of the salary using the Income starts and Income ends fields. By default, these will be set to 'Already started' and '[Client's] retirement' respectively.
4
Determine the Annual increase on the salary. This is typically utilized to reflect the average or expected cost of living adjustment each year.
What does "Exclude from SS Tax" do?
If a client is working a job that does not pay into Social Security, you can check the 'Exclude from SS tax' box to indicate that the salary is not subject to SS tax. Once selected, the salary income will only be subject to Medicare tax.
Please click on the dropdown arrows below for more information on...
Salary cards will be taxed as W2 income within client plans, which can be found on Line 1 of the 1040. Sample tax forms can be viewed in the Tax > Tax Estimate > Details tab:
Salary income can be tracked within the Retirement > Cash Flows > Summary page, by clicking into the Income Inflows column:
For clients without W2 income, these cards can be removed. Open the card, click the 'Delete' button at the bottom of the data entry drawer, and then click Delete. If you remove a salary card and need to add it back at any time, you can do so by clicking Add > Income > Salary.
The other pre-populated entry within the Income section is the Social Security card. This card can be used to reflect both current and future Social Security retirement benefits. Click on this card to open a data entry drawer on the right side of your screen:
If the client is already receiving Social Security retirement benefits, check the Already Receiving box in the upper right of the card. You can then enter the Monthly amount that they are receiving, as well as the initial Filing age.
If the client has not begun receiving benefits, leave the 'Already receiving' box unchecked. The Filing age and Filing month will determine when retirement benefits will begin within the projections. The Estimated benefit amount determines how future benefits will be calculated:
Use Simple Estimate - Benefits are estimated using the annual amount and projected annual increase entered into that client’s Salary or Self-employment income card.
Based on SS Statement Value - You will be asked to enter the monthly benefit amount and corresponding start age from the client's Social Security statement.
Based on Historical Covered Earning - You will be asked to enter the client's annual covered earnings history.
No Social Security - RightCapital will not calculate a retirement benefit for the client. We will also exclude any spousal or survivor benefits for that individual.
Learn more about entering Social Security benefits
For a more detailed walkthrough of the data entry process for Social Security, please feel free to reference the article below:
Please click on the dropdown arrows below for more information on...
Social Security income is typically taxed to some extent for most individuals. The exact amount is dependent on a number of variables, such as a household's combined income and state of residence. To read more about when social security is taxable in RightCapital, click here.
Social Security income can be tracked within the Retirement > Cash Flows > Summary page, by clicking into the Income Inflows column:
Although Social Security cards cannot be deleted like other income cards, you can turn Social Security benefits off for a given individual by opening their SSA card, and choosing the 'No Social Security' option within the Estimated Benefit Amount dropdown:
To add additional sources of income to a client plan, click the blue 'Add' button in the upper right. This will allow you to choose from a long list of income options:
For more information on self-employment income, pension income, and other types of income in RightCapital, feel free to visit the link below:
There will be a handful of savings cards pre-populated within this section when you create a new client plan. You will always find one 401(k) savings card for each client. You may also see a Taxable savings card, depending on your plan settings.
For clients with 401(k) accounts, you can use the pre-populated 401(k) savings cards for one or both clients. Click on this card to open a data entry drawer on the right side of your screen, allowing you to input the details:
1
The Saving name will default to [Client's] 401(k), but you can enter a custom name if you'd like. In joint plans, you will also want to choose either the client or the co-client as the Owner.
2
Enter the client's annual Contribution to their 401(k). Depending on the option you choose in the Target field, this can be an annual dollar amount, a % of the client's income, or the maximum contribution amount.
3
Specify the duration of the contributions using the Saving starts and Saving ends fields. By default, these will be set to 'Already started' and '[Client's] retirement' respectively.
4
Enter the details of the employer match, starting with the Primary match (full or partial) and the Primary match to (% of client's contribution). If necessary, you can also specify the Secondary match and Secondary match to percentages.
A common example might look like a full match of 100% up to 3% of the client's contribution, and a partial match of 50% up to 5% of the client's contribution:
5
For non-elective employer matches, you can skip the primary and secondary matches and instead enter a Flat percent match or a Flat dollar match. These will occur regardless of employee contributions.
6
If some or all of the employer match is designated as a Roth contribution (as per Secure Act 2.0), indicate this percentage in the % of match to Roth field.
What does "Self-employed" do?
Checking the Self-employed box will cause this card to calculate employee/employer contributions based on the client's Self-employment income, rather than Salary income.
Please click on the dropdown arrows below for more information on...
Total employee contributions will be capped at the IRS maximum value ($23,500 for 2025, plus $7,500 catch-up at 50, $11,250 from 60-63). For salaried clients, 401(k) contributions will be deducted from the client's wages on Line 1 of the 1040. With the 'Self-employed' box checked, contributions will be treated as Adjustments to Income (Line 16 of Schedule 1, Line 10 of the 1040).
Sample tax forms can be viewed in the Tax > Tax Estimate > Details tab:
Client contributions can be tracked in two locations within the Retirement > Cash Flows:
The Summary tab > Planned Savings column
The Invested Asset tab > Planned Savings column
Employer matches can be found in the Invested Asset tab > Employer Match & Other column:
For clients that are not making 401(k) contributions, these cards can be removed. Open the card, click the 'Delete' button at the bottom of the data entry drawer, and then click Delete. If you remove a 401(k) card and need to add it back at any time, you can do so by clicking Add > Savings > 401(k)/403(b)/457(b) > 401(k):
If your Planning Method setting is set to 'Modified Cash Flow Based' or 'Goal Based' as a default, a Taxable savings card will also be pre-populated in the Savings area. Use this card to reflect after-tax contributions into a taxable investment / brokerage account:
Start by choosing the client, co-client or joint as the Owner. Depending on your chosen Target option, enter the Contribution as an annual dollar amount or as a percentage of income. Lastly, dial in the Saving starts and Saving ends dates to determine the duration of the contributions.
If you have 'Annual dollar amount' chosen as your target you can enter an optional Annual Increase, which will be applied to the contribution amount each year within the cash flow projections.
Don't see a Taxable savings option?
If you are using a 'Cash Flow Based' planning method, any and all excess cash flows will be automatically saved and reinvested into the client's taxable account bucket. This function eliminates the need for you to manually enter taxable savings.
To learn more about the planning method setting and its impact on your client plans, feel free to reference the article below:
Taxable savings can be easily tracked within the Cash Flows module in the Retirement section. Within the Cash Flows > Summary, taxable savings will be reflected in the Net Flows column to the far right. Negative numbers in this column (numbers within parenthesis) indicate cash flow shortfalls. Excess income that is not being saved into the taxable bucket will be displayed in the 'Spend Unsaved Cash Flows' column:
Important Note on Taxable Savings:
Please note that taxable savings will only occur in years that clients have adequate income to make those savings. For example, if you enter $10,000 in taxable savings and the clients only have a $5,000 cash flow surplus in a given year, only $5,000 will be saved. In years with cash flow deficits, taxable savings will not occur.
To add additional savings to a client plan, click the blue 'Add' button in the upper right. This will allow you to choose from a long list of savings options:
For more information on 403(b)/457(b) savings, Traditional and Roth IRA savings, and other types of income in RightCapital, feel free to visit the link below:
For clients that have yet to retire, the pre-retirement living expenses card can be utilized to capture the household's monthly expenses within the projections. Click on this card to open a data entry drawer on the right side of your screen, allowing you to input the expense information.
Important Note on Living Expenses
When entering living expenses, please be mindful that this number should not include taxes or expenses that you have already captured in the Net Worth section. This includes mortgage and other loan payments, insurance premiums, and property taxes and maintenance fees.
There are two options when it comes to inputting living expenses- the quick and easy Simple Approach, and a more granular Detailed Worksheet:
The Simple Approach will ask you for a single amount, representing the sum total of the client's average monthly spending.
The Detailed Worksheet allows you to break out expenses into more specific expense categories, the sum of which will make up a client's monthly living expenses.
When using the Detailed worksheet, the expense categories are shared between the pre-retirement and retirement living expense cards, as well as the Budget module. If you've already filled out a detailed expense worksheet in either of these other locations, you can choose to copy the values into the pre-retirement living expense card via the "Copy From" button:
Customize your expense categories!
Budget / expense categories can be customized on a per client basis within the Gear Icon > Settings > Budget Categories tab. This can only be done after completing the initial data entry process.
To learn more about custom expense categories in RightCapital, click here.
Living Expenses will increase each year based on your General Inflation Rate, and can be tracked within the projections by navigating to the Cash Flows module in the Retirement section. Within the Cash Flows > Summary, click into the Expenses > Living Expense column: